Ok, so I guess making food techinically isn't crafting, but oh well. It's my blog & I'll post what I want, lol! ;)
So my most recent go-to for bringing to potlucks are these bacon devilled eggs. They are super yummy, contain no mayo, and have no dill in them. I'm not a dill fan. They're also super yummy because BACON. And Sriracha. Seriously, I have to be sneaky & make these when my husband isn't home, because he will eat so many of them before they ever hit the egg carrier! I almost never get out the door with a full batch in hand!
You can make these with or without avocado. They're just as good, either way. I don't much care for avocado, so I prefer them without it, but the hubster looooooooves avocado & likes them better with it. You'll win either way. (PSA: Some people are allergic to avocado. If making these for a group, you may want to check if anyone cannot have avocado before you include it.)
I meant to make these today for my family's New Year's Eve party, but I got slammed by a pretty nasty head cold. In the interest of not infecting anyone, I'm going to avoid handling food meant for public consumption. Sadly, that means no pics for this post today, but I'll add some the next time I make these.
Here's the recipe:
Bacon Devilled Eggs
(or I like to call em Classy Redneck Devilled Eggs)
You'll need:
12 eggs, hardboiled, peeled, & cut in half lengthwise
6 strips of bacon, crumbled
6 Tablespoons liquid fat (ie bacon fat, olive oil, a combination of these, etc.)
Sea Salt
Paprika
Sriracha (or other hot sauce of your choice)
Optional: 1 avocado, peeled & diced
1. Pop egg yolks into a mixing bowl. Set aside egg whites.
2. Add to the bowl your 6 Tbsp of liquid fat, 2/3 of the bacon crumbles, & the avocado (if using it). Mash, mix, or blend together with your squishing implement of choice (fork, handheld mixer, etc).
3. Fill egg whites with this mixture.
4. Top eggs with remaining 1/3 of bacon crumbles. Sprinkle with salt & paprika to taste. (I like a light touch of salt & a whole lot of paprika.) Finish with a small stripe or dot of Sriracha on each egg. (A little goes a long way!) Serve chilled.
Note: If using avocado, make eggs as close to serving time as possible, as the avocado will brown the longer it is exposed to air.
December 31, 2013
December 27, 2013
Amish Puzzle Ball
I made a LOT of crafty projects this holiday season! (And I'm not done yet, either!) Hopefully I'll get most of them up on the blog for you all to enjoy! Here's one of my favorites from the list: a crocheted Amish Puzzle Ball for my 18-month-old niece.


Here's the pattern on Ravelry. The ball is made up of three rings, each of which have 4 wedges. You slip the rings over each other to form the ball.
This was a nice stash buster pattern. But don't be fooled: it EATS both yarn (for the wedges) & stuffing! Overstuffed is best on this one, as it will help the rings interlock better.
Made mine with worsted weight cotton yarn, because I had it already, rather than buying the DK yarn the pattern called for. The yarn deviation made the finished ball delightfully huge--probably about 6 or 7 inches in diameter, I think.
I don't know what brand the mixed-color yarn is. A ball of it was gifted to me. I had no idea how I was going to use it at the time, but this project was perfect for it! I ran out of that yarn just before I finished the last wedge piece of the green ring. Having nothing that blended well with that mixed yarn, I chose to complete the wedge with the green of the ring band. When the ball is put together, you can't even tell!
The blue, purple, & green yarns were harvested from an abandoned project: a hexagon pieced baby blanket I meant to have done before this niece was born. I didn't even get enough of it made to be a decent scarf, so it was all banished for a good long while, until the ball project came up. Still not sure what I'll do with the original blanket, but I don't think I'll be returning to it.
I'll definitely be keeping this ball pattern on hand! Fun to make, only three yarn tails to work in at the end, no batteries required, washable, soft & cuddly, etc. I'm not sure how my niece liked it, since she was pretty distracted by the other toys she'd just unwrapped which blinked & booped & such (we're a whole family of ADOS: Attention Deficit--Oooh Shiney!!!), but the adults were all pretty impressed! ;)
December 7, 2013
Baby Gift Set
I decided to make a cute, puppy themed gift set for a friend's baby shower. Set includes a lovey/security blanket/blankie buddy, two wash cloths, and a loofa that stretches out flat to dry. Lots of patterns referenced for this project, plus some parts that I came up with on my own. (I wish I had made the puppy ears bigger. If I ever try this one again, I'll revisit my puppy ear pattern, below.)
Everything was made using Lily Sugar'n Cream cotton yarn & a 4.25mm/G hook, ignoring any & all yarn & hook suggestions in all the original patterns linked below.
Puppy Lovey/Blankie Buddy


Inspired by this Security Blanket Bunny pattern.
Start with a cloth made in your favorite pattern, worked up to approximately 18" x 18". A center-start, in-the-round pattern will be ideal. I used the Baby Granny Three Ways pattern from Ravelry, worked up to round 13. I finished the cloth as follows: Rnd 14: Ch 2 (counts as 1st sc). In back loops only, sc in ea dc across; at corners, work (2sc, ch 1, 2sc) in ch1 sp. Join to beginning of Rnd 14 with sl st. Finish off. Rnd 15: Join contrasting color at any sc. Ch 2 (counts as 1st sc of rnd). Sc in ea sc across; at corners, work (2sc, ch 1, 2sc) in ch 1 sp. Join to beginning of Rnd 15 with sl st. Rnd 16: Ch 2. Work sc in sc to right of your current place (=crab stitch). Continue with 1 crab stitch in ea sc across; at corners, work 1 crab stitch in ch 1 sp. Join to beginning of Rnd 16 with sl st. (You likely won't be able to see an easy spot to join, like you would in normal sc. Just fudge it & sl st wherever it looks best to you.) Finish off.
Puppy Head
Rnd 1: Magic Ring. Ch 2 (counts as 1st sc). 5 scs in ring. Join to 2nd ch w/ sl st. (6 sc)
Rnd 2: Ch 2 (counts as 1st sc). 2 sc in ea sc. Join to 2nd ch w/ sl st. (12 sc)
Rnd 3: Ch 2 (counts as 1st sc). * 2 sc in next sc, 1 sc in next sc. Repeat from * around. Join to 2nd ch w/ sl st. (18 sc)
Rnd 4: Ch 2 (counts as 1st sc). 1 sc in next sc. * 2 sc in next sc. 1 sc in ea of next 2 sc. Repeat from * around. Join to 2nd ch w/ sl st. (24 sc)
Rnd 5-8: Repeat Rnd 4.
Rnd 9: Ch 2 (counts as 1st sc). 1 sc in nest sc. * Work dec over next 2 sc. 1 sc in ea of next 2 sc. Repeat from * around. Join to 2nd ch w/ sl st. (18 sc)
Rnd 10: Ch 2 (counts as 1st sc). * Work dec over next 2 sc. 1 sc in next sc. Repeat from * around. Join to 2nd ch w/ sl st. (12 sc)
The gifts were well received! One of the other party goers said I need to make her a set whenever she has a baby shower. :)
Everything was made using Lily Sugar'n Cream cotton yarn & a 4.25mm/G hook, ignoring any & all yarn & hook suggestions in all the original patterns linked below.
Puppy Lovey/Blankie Buddy


Inspired by this Security Blanket Bunny pattern.
Start with a cloth made in your favorite pattern, worked up to approximately 18" x 18". A center-start, in-the-round pattern will be ideal. I used the Baby Granny Three Ways pattern from Ravelry, worked up to round 13. I finished the cloth as follows: Rnd 14: Ch 2 (counts as 1st sc). In back loops only, sc in ea dc across; at corners, work (2sc, ch 1, 2sc) in ch1 sp. Join to beginning of Rnd 14 with sl st. Finish off. Rnd 15: Join contrasting color at any sc. Ch 2 (counts as 1st sc of rnd). Sc in ea sc across; at corners, work (2sc, ch 1, 2sc) in ch 1 sp. Join to beginning of Rnd 15 with sl st. Rnd 16: Ch 2. Work sc in sc to right of your current place (=crab stitch). Continue with 1 crab stitch in ea sc across; at corners, work 1 crab stitch in ch 1 sp. Join to beginning of Rnd 16 with sl st. (You likely won't be able to see an easy spot to join, like you would in normal sc. Just fudge it & sl st wherever it looks best to you.) Finish off.
Puppy Head
Rnd 1: Magic Ring. Ch 2 (counts as 1st sc). 5 scs in ring. Join to 2nd ch w/ sl st. (6 sc)
Rnd 2: Ch 2 (counts as 1st sc). 2 sc in ea sc. Join to 2nd ch w/ sl st. (12 sc)
Rnd 3: Ch 2 (counts as 1st sc). * 2 sc in next sc, 1 sc in next sc. Repeat from * around. Join to 2nd ch w/ sl st. (18 sc)
Rnd 4: Ch 2 (counts as 1st sc). 1 sc in next sc. * 2 sc in next sc. 1 sc in ea of next 2 sc. Repeat from * around. Join to 2nd ch w/ sl st. (24 sc)
Rnd 5-8: Repeat Rnd 4.
Rnd 9: Ch 2 (counts as 1st sc). 1 sc in nest sc. * Work dec over next 2 sc. 1 sc in ea of next 2 sc. Repeat from * around. Join to 2nd ch w/ sl st. (18 sc)
Rnd 10: Ch 2 (counts as 1st sc). * Work dec over next 2 sc. 1 sc in next sc. Repeat from * around. Join to 2nd ch w/ sl st. (12 sc)
Rnd 11: Ch1, pull up loop in next sc, yarn over, pull loop through both loops on hook (counts as first dec). * Work dec over next 2 sc. Repeat from * around. Join to beginning of Rnd 11 w/ sl st. Finish off, leaving long tail for sewing later. (6 sc)
Embroider eyes, nose, & mouth in desired position.
Left Ear
Magic Ring. Ch 2 (counts as 1st sc). 3 sc in ring. Ch 2. 2 sc in ring. Join to 2nd ch. Ch 2. Sc in same place of joining. Sc in ea of next 2 sc. Finish off.
Right Ear
Magic Ring. Ch 2 (counts as 1st sc). 4 sc in ring. Ch 2. 1 sc in ring. Join to 2nd ch. Ch 2. Sc in same place of joining. Sc in ea of next 2 sc. Finish off.
Paw Print Applique
I used a pattern for Paw Print Earrings to make the paw print applique for the blankie.
Assembly
Sew ears to opposite sides of head, with points of ears facing forward and down, right sides facing out.
Stuff head with stuffing or scrap yarn. Sew head to center of blankie.
Sew paw print to one of the front corners of the blankie.
Finish off all ends.


I used two different patterns for the sake of variety. One wash cloth was done in the Oh So Soft Baby Washcloths pattern on Ravelry. I started this one with a row of foundation sc, instead of a base chain. The other wash cloth was done in this Crocheted Square Washcloth pattern. Both were finished with the same 2-row border as the blankie was. Both also got a paw print applique to match the one on the blankie.
Loofa


I used this Bath Puff pattern to make the loofa, swapping the hearts at the ends of the ties with more paw prints. My only change to the original pattern was to work the last row as ch 2, sl st, repeat, rather than the pattern's ch3, sl st, repeat.
The gifts were well received! One of the other party goers said I need to make her a set whenever she has a baby shower. :)
July 10, 2013
Catnip Cake

My latest crafty endeavor was a gift for my Maine Coon cat, Tali! Her birthday is on the Fourth of July. This year, she turned four. The fur-kid is a bit spoiled, I suppose, seeing as I like to do a little something for her for each birthday. In the past, it's been a new toy, but funds are tight and the urge to create things has been strong lately, so I decided I'd stash bust and make her a toy this year.
I tried to free hand this one, making the pattern up as I went, but it just wasn't turning out right. So, Ravelry to the rescue again! Here's the pattern I worked up.
I used a 2.25mm hook, purple worsted weight yarn, mint worsted weight yarn, & pink fingering weight yarn.
Bottom tier is supposed to be one row higher, but I goofed when reading the pattern. Oh well. I like how mine turned out better. :)
Flowers were made as follows:
Make a magic ring. * Ch3, sl st inside ring. Rep from * for a total of 5 petals. Sl st in very 1st ch. Pull magic ring closed. Weave in ends to connect first & last flower petals.
The flowers & cake tiers were securely sewn & tied to prolong the life of the toy & ensure kitty safety. (Can't have those flowers coming off & getting eaten!)

Cake was stuffed with scrap yarn (yay stash busting!) and LOTS of catnip!!!
Tali loved her new toy & mauled it immediately. :D

So, yeah. I crocheted a cake. For my cat. For her birthday. My Crazy Cat Lady Membership Card should arrive in the mail any day now. ;)
May 15, 2013
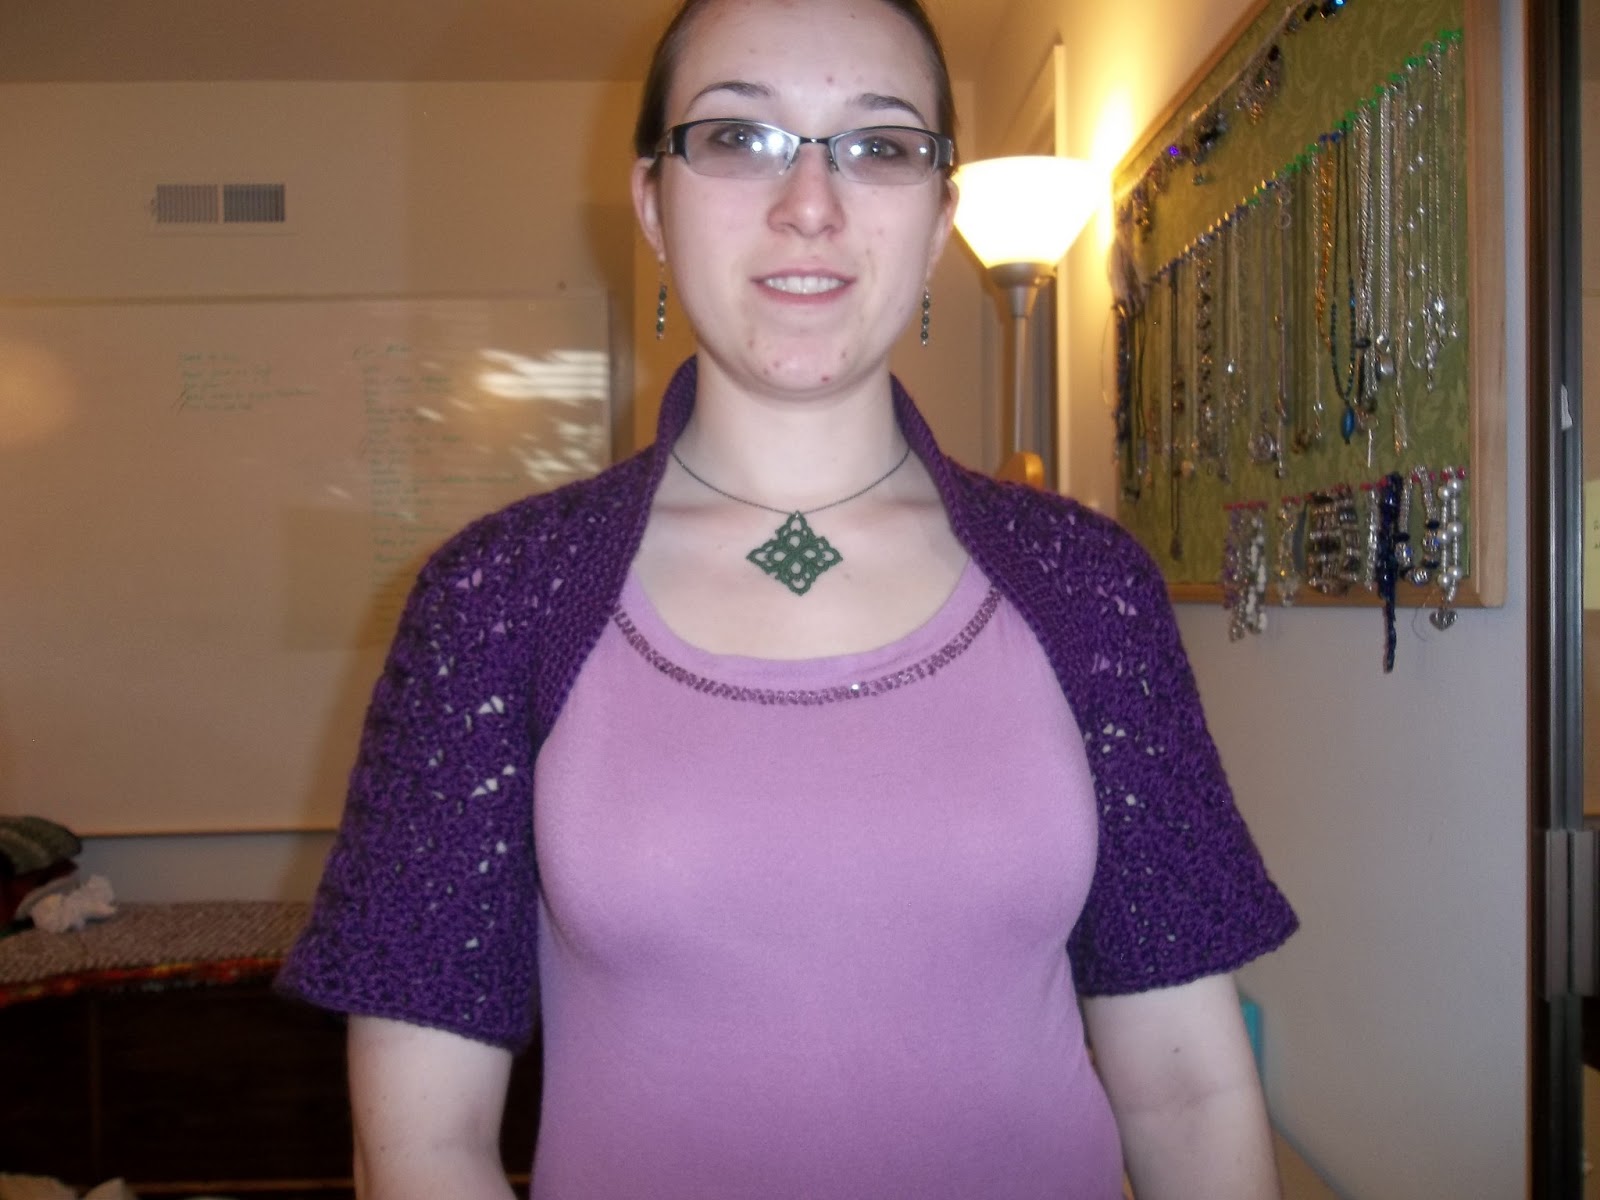
Easy Crocheted Shrug
I've found that I need more shrugs & cardigans in my life. In winter, I noticed I've started to get sweat stains that need covering, and now that it's 90+ degrees, I'm wearing tops that, while otherwise work-appropriate, show my bra straps. Not cool when you're a doctor. So I went hunting for a shrug pattern to crochet. I decided to start with the Easy Shell Shrug on Ravelry. Here's how it turned out!


This pattern is more of a set of guidelines, than a precise recipe. Basically, you’re making a rectangle of fabric, stitching the ends together to make sleeves, then finishing it with a collar. You can use any stitch you’d like. I made mine with the shell stitch in the pattern.
Edits to the original pattern:
I started with a row of foundation sc, to have a bit more give than a foundation chain would. I worked the fsc until I reached my desired length. (I wanted mine longer sleeved than the original.) I then worked the shell pattern until the fabric became tall enough to comfortably go around my arm & shoulder while wearing a short sleeved shirt.
The row of fsc is at the bottom of the shrug. I like having more give around my neck than my back, so it worked best oriented this way.
The collar as-written curled wildly, as the picture below shows. The original has Row 2 as: 2 sc in ea sc of row 1. I frogged the collar, & did row 2 as: 1 sc in ea sc of row 1. I worked all other rows of the collar as written. Came out perfectly, & just as pictured.

Finally, I wanted a more finished look to the ends of the sleeves, so I did one row of sc on each sleeve.
Overall, very happy with this project. :D
See my Ravelry project page over here.
Necklace from TotusMel. Go get one! :)

This pattern is more of a set of guidelines, than a precise recipe. Basically, you’re making a rectangle of fabric, stitching the ends together to make sleeves, then finishing it with a collar. You can use any stitch you’d like. I made mine with the shell stitch in the pattern.
Edits to the original pattern:
I started with a row of foundation sc, to have a bit more give than a foundation chain would. I worked the fsc until I reached my desired length. (I wanted mine longer sleeved than the original.) I then worked the shell pattern until the fabric became tall enough to comfortably go around my arm & shoulder while wearing a short sleeved shirt.
The row of fsc is at the bottom of the shrug. I like having more give around my neck than my back, so it worked best oriented this way.
The collar as-written curled wildly, as the picture below shows. The original has Row 2 as: 2 sc in ea sc of row 1. I frogged the collar, & did row 2 as: 1 sc in ea sc of row 1. I worked all other rows of the collar as written. Came out perfectly, & just as pictured.

Finally, I wanted a more finished look to the ends of the sleeves, so I did one row of sc on each sleeve.
Overall, very happy with this project. :D
See my Ravelry project page over here.
April 8, 2013
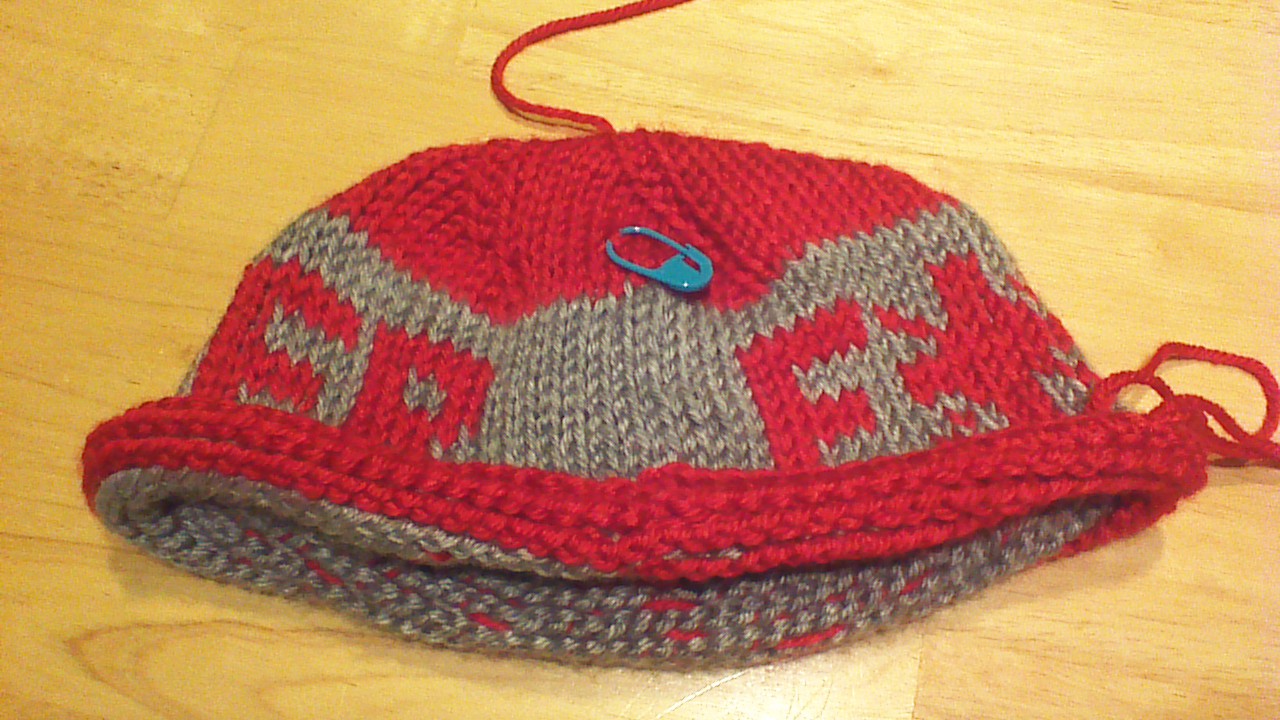
F*ck Cancer Hat Pattern, In Tunisian Crochet
Success! I finished making the F*ck Cancer hat, a knit pattern, in Tunisian crochet! I've been asked to post the pattern, so it's included in this post. Are there things I wish I'd done differently? Sure. But I'm happy enough with how it turned out to not want to frog it again. (See note at beginning of pattern for the changes I'd make.)


One of these days, I may try to make this hat entirely differently, with a circular crochet hook (much like circular knitting needles), tunisian simple stitch (vs. the tunisian knit stitch featured in this pattern), and a reconfigured chart. If I ever get around to that, I'll be sure to post it.
Here's the original knit pattern.
I've heard from many of my crocheting friends that they aren't well versed in tunisian crochet. If you need a refresher, or if your hearing about it for the first time, here are some useful tutorials:
Tunisian Crochet in the Round (great place to get started)
Tunisian in the Round, Spiral Technique (I used this technique to start off the hat)
Tunisian Knit Stitch
***When doing the colorwork section, you need to "lock" the yarn to avoid having large loops on the inside of your hat, or having to cut threads a million times & work them all in later. Here's how to lock your yarn: The color you're working with in the chart (forward pass) will be on your left hand side (for right handers. I'm not sure how tunisian is done left handed), and the unused color on your right. Work forward until you come to a color change. Cross the old color on the left over the new color on the right. This puts the new color on the left now, & the old color on the right. Pick up loops with new color. When you come to the next switch in colors, again cross the color on the left that you've been working with, overtop of the color on the right, before you start picking up loops with the next color. If you're working a section that is more than three (3) stitches of one color, lock your unused yarn every 2 or 3 stitches to carry it to the next section. To do that, cross the color you are working with over, then under the color you're not using.***
***Because this hat is done in Tunisian Knit Stitch, you DO NOT need to change colors for the return pass of the color work section. Tunisian Knit Stitch pushes the yarn used for the return pass to the back side of the piece, where it will remain relatively unseen from the front side. Rejoice in having less tails to work in later!***
F*ck Cancer Hat in
Tunisian Crochet
Supplies needed
5.5mm double ended afghan hook
5mm standard crochet hook
Yarn needle
Stitch marker (to mark beginning of each round)
2 contrasting colors soft, worsted weight yarn
Abbreviations
MC Main
Color
Ch(s) Chain(s)
Rnd Round
Tss fp Tunisian
Simple Stitch, forward pass
St(s) Stitch(es)
Rp Tunisian
return pass
Tks Tunisian
knit stitch
Ea each
CC Contrasting
Color
Fp forward
pass
Prev previous
Tks dec Tunisian
knit stitch decrease
BL Back
loop
SC single
crochet
Sl st slip
stitch
Fp hdc front
post half double crochet
Nxt next
Bp hdc back
post half double crochet
Hdc half
double crochet
Notes
Keep your tension LOOSE to minimize the amount of curling the piece will do. Feel free to use a larger tunisian hook if necessary.
Body of hat may look better w/ 2 repeats of Rnd 13. If
worked this way, do not do row 6 of hat band.
Hat body
5.5 mm double ended afghan hook. Worked in a spiral.
MC, Ch 84. Do not join to beginning of chain.
Rnd 1: Insert hook in
spine of 2nd ch from hook. Tss fp in all chs. (84 sts)
Rp w/ 2nd
strand of MC, until 4 loops remain on hook.
Rnd 2: Tks in 1st
Tss of rnd 1, to form ring. Be sure ring is not twisted.
Tks in ea
Tss across, working Rp when piece prevents further forward working. (84 sts)
Rnd 3: Tks in ea Tks of
rnd 2. (84 sts)
Now we will begin using the chart, starting at the bottom right corner.
Switch to CC, both Fp strand & Rp strand.
Switch to CC, both Fp strand & Rp strand.
Rnd 4-6: Tks
in ea Tks of prev rnd. (84 sts per rnd)
Rnd 7-16: Work
chart in Tks, alternating colors on Fp only. Rp on all rows with CC only. Use
separate strand of MC for each rnd; do not carry MC from end of chart to
beginning of chart. (84 sts per round)
Rnd 17-19: With CC
only, Tks in ea Tks of prev rnd. (84 sts per rnd)

Switch to MC, both Fp strand & Rp strand.
Rnd 20: Tks
in ea Tks of prev rnd. (84 sts)
Rnd 21: 6
Tks, 1 Tks dec, *12 Tks, 1 Tks dec. Rep from * 4 times. 6 Tks. (78 sts)
Rnd 22: 6
Tks, 1 Tks dec, *11 Tks, 1 Tks dec. Rep from * 4 times. 5 Tks. (72 sts)
Rnd 23: 5
Tks, 1 Tks dec. *10 Tks, 1 Tks dec. Rep from * 4 times. 5 Tks. (66 sts)
Rnd 24: 5
Tks, 1 Tks dec. *9 Tks, 1 Tks dec. Rep from * 4 times. 4 Tks. (60 sts)
Rnd 25: 4
Tks, 1 Tks dec. *8 Tks, 1 Tks dec. Rep from * 4 times. 4 Tks. (54 sts)
Rnd 26: 4
Tks, 1 Tks dec. *7 Tks, 1 Tks dec. Rep from * 4 times. 3 Tks. (48 sts)
Rnd 27: 3
Tks, 1 Tks dec. *6 Tks, 1 Tks dec. Rep from * 4 times. 3 Tks. (42 sts)
Rnd 28: 3
Tks, 1 Tks dec. *5 Tks, 1 Tks dec. Rep from * 4 times. 2 Tks. (36 sts)
Rnd 29: 2
Tks, 1 Tks dec. *4 Tks, 1 Tks dec. Rep from * 4 times. 2 Tks. (30 sts)
Rnd 30: 2
Tks, 1 Tks dec. *3 Tks, 1 Tks dec. Rep from * 4 times. 1 Tks. (24 sts)
Rnd 31: 1
Tks, 1 Tks dec. *2 Tks, 1 Tks dec. Rep from * 4 times. 1 Tks. (18 sts)
Rnd 32: *1
Tks, 1 Tks dec. Rep from * 6 times. (12 sts)
Rnd 33: 6 Tks
dec. (6 sts)
Rnd 34: Bind
off in Tks (6 sts)
Cut & work in tails.
Hat band
5mm standard crochet hook. Worked in Rows.
Insert hook into foundation chain, BL & spine only. Pull
up loop of MC.
Row 1: Ch
1. SC in same stitch, BL & Spine only. SC in ea ch across, BL & spine only.
Sl st to join to beginning sc. (84 sts).
Row 2: Ch 3.
Fp hdc in nxt sc. Alternate bp hdc & fp hdc in ea sc across. Sl st to join
to 3rd ch. (84 sts)
Row 3-6: Ch 3.
Fp hdc in nxt hdc. Alternate bp hdc & fp hdc in ea hdc across. Sl st to
join to 3rd ch. (84 sts per row)
Cut yarn, finish off, & work in tails.
Block if necessary.
Progress Pictures
Hat body complete, no work yet done on the band. Tks is VERY curly!

Hat band, Row 1, front side.
You can see the front & back loops of the foundation chain next to my thumb.
Hook is inserted under back loop & spine of foundation chain to work a sc.
This helps fight the curl of Tks.

Hat band, Row 1, back side.
My fingernail is agains the end of the back loop & spine of a foundation chain.
Hook is inserted under back loop & spine of a foundation chain.

After adding Row 1 of hat band. Curl already diminishing.

Halfway through Row 2 of hat band. Curling is pretty much gone already.

Fin!
April 1, 2013
Happy Tatting Day!
It's International Tatting Day!
(No, really. Not an April Fools joke. It's an actual thing.)
Want to find out more? Head over to one of my favorite blogs, from TotusMel!
Want to celebrate? Pick up one of TotusMel's beautiful tatted pendants, in any color you'd like! Only $5 today! (Will be full price after today.)
Looking for a nifty tatting pattern? TotusMel has you hooked up on that front, too! Instant downloadable PDF of the above pendant, as well as it's matching bracelet & earrings! Check it out!
What tatting will I be doing today? Likely, not much. I'm being a productive business owner today, & when I get home, I'll be finishing up the F*ck Cancer hat I showed you in an older post. If I get the chance this evening, the tatting needle might come out to play, though...
Happy Tatting Day!
March 18, 2013
Will Film for Corsets!
My favorite corsetier, Generations of Art, posted a contest on Facebook to create the best video tutorial on how to lace a corset using her Lock Lacing method, so that she can link her customers to it. I love the corset she made for my wedding, so I had to jump on this chance! :) I'm not an "off-the-rack" shaped lady, so I'm so happy to have found a corset maker that I can walk right up to at many of the anime conventions we attend each year, get custom measurements, and order specific fabrics. Also, all of her corsets are very high quality, with great, strong fabrics and spiral steel boning throughout, and they're all FULLY REVERSIBLE!!! Seriously, check her out!
So here's the little tutorial I made for the contest.
And I won! Woot! Totally makes the time spent on multiple takes, and the blisters my fingers endured from those takes, totally worth it!
My prize: $100 credit toward a custom corset of my choosing! :D Would've completely covered a cincher, but I've been drooling over the Suzi style for a long while now. It's an adorable, 50's/rockability style corset dress. And oh yeah, it's reversible too!
Got my shiny new corset dress ordered & new measurements taken over the weekend while at Naka Kon. Should be here in a month or so. *happy dance*
Now I'm curious, any interest out there for a video tutorial on how to straight lace? Good for those corsets that are a smidge too loose.
March 17, 2013
The Quest Continues...
... to discover the best way to make a knit hat without knitting it.
As I've mentioned before, I hate knitting. So imagine my surprise when I discovered that a pattern I like & promised to make for a friend to gift to someone ended up being a knit project! Thought it was crochet when I saved the link originally, & just had it in my head all this time that it was crochet. So now I have a comissioned project to complete, and by golly I'm not going to knit it! Mostly because I haven't learned how to knit in the round, or how to do colorwork in knit, and I certainly don't care to learn.
Enter tunisian crochet.
Tunisian is the odd middle child between crochet & knitting. With tunisian, you "cast on" loops of stitches like in knitting, using a very long crochet hook, then work them back off the hook with a return pass in a method more like crochet. The resulting fabric is denser & less stretchy than either of the other yarn crafts, and can also make textures unobtainable otherwise. If using multiple colors, interesting effects can be created, including "peekaboo" or illusion efects & reversible fabrics. Tunisian can also create fabrics that look just like knitting, albeit denser.
So I've been working on the hat, trying different methods of tunisian to achieve the correct finished look. So far, I've gotten close, but I'm not quite there yet. (my initial attempt to make the hat in sc was abandoned when I realized that sc stitches don't stack one directly above the other, which skews the text of the pattern's chart into something unreadable.) I started off making the hat just as the pattern calls, replacing true knit with tunisian knit stitch (tks). Working bottom up, the result was SUPER huge! Frogged & tried again, with fewer stitches around the brim of the hat, discovering a stitch number that fit better. Of course, this meant completely reworking the pattern chart to fit in a smaller number of stitches. Once figured out, I worked up the hat a bit beyond the wording section & was overall happy with how it was turning out. Tried it on again & discovered that the hat tightened up a lot as I worked. Just the nature of tunisian I suppose. So it was time to start over on the hat. Le sigh.
But opprotunity can be found even in our failed attempts! In my tunisian research, I found out that you can use tunisian crochet to create a true knit fabric. Without touching those dreaded knitting needles.
Mind. Blown.
I HAD to try this! And looky here, I had a piece of tunisian crochet with no use that I could play with!
The example I found took a hat made with tunisian simple stitch (tss, aka afghan stitch), and once finished, completely removed the yarn used for the return pass, leaving the creator with a true knit.
Here's my attempt at the same, with a piece made in tks:
 The original piece. All tks. Tunisian curls like crazy.
When I tested the amount of stretch on the original tks piece, I found that a 1 inch section stretched to an additional 1/8 inch, at maximum.
 Other side of the original piece. Tks.
 Yarn from the return pass pulled out of the top half of the piece. Still remains in the bottom half. Gives you an idea of the differet thicknesses between tks & true knit. Also, the resulting knit is much more flimsy/holey than the original tks. I'd imagine it wouldn't be as warm.
 Back side, again with the yarn from the return pass removed from the top half only.

 All done. The knit that was left is still a little curly, but not so much as with tunisian. Also was left with some lovely holes from what I suppose could be called dropped stitches, though I didn't actually drop any that I'm aware of. Likely just user error that could be prevented with a little more practice. And the color changes are pretty messy in a couple spots, especially on the tail of the K. A 1 inch section of this resulting knit stretched an additional 1/4 inch at maximim.
Overall, I'd say not a bad experiment here. The verdict: yes you can cheat your way into a knit fabric using tks. I wouldn't do this with color changes, without more practice to see if it can be done without becoming so sloppy looking. Also not sure how the finished look would turn out when starting with tss vs tks. The increased holey-ness in the resulting knit could be countered by doing the tunisian with a tighter guage.
But the quest for this hat continues...
As I've mentioned before, I hate knitting. So imagine my surprise when I discovered that a pattern I like & promised to make for a friend to gift to someone ended up being a knit project! Thought it was crochet when I saved the link originally, & just had it in my head all this time that it was crochet. So now I have a comissioned project to complete, and by golly I'm not going to knit it! Mostly because I haven't learned how to knit in the round, or how to do colorwork in knit, and I certainly don't care to learn.
Enter tunisian crochet.
Tunisian is the odd middle child between crochet & knitting. With tunisian, you "cast on" loops of stitches like in knitting, using a very long crochet hook, then work them back off the hook with a return pass in a method more like crochet. The resulting fabric is denser & less stretchy than either of the other yarn crafts, and can also make textures unobtainable otherwise. If using multiple colors, interesting effects can be created, including "peekaboo" or illusion efects & reversible fabrics. Tunisian can also create fabrics that look just like knitting, albeit denser.
So I've been working on the hat, trying different methods of tunisian to achieve the correct finished look. So far, I've gotten close, but I'm not quite there yet. (my initial attempt to make the hat in sc was abandoned when I realized that sc stitches don't stack one directly above the other, which skews the text of the pattern's chart into something unreadable.) I started off making the hat just as the pattern calls, replacing true knit with tunisian knit stitch (tks). Working bottom up, the result was SUPER huge! Frogged & tried again, with fewer stitches around the brim of the hat, discovering a stitch number that fit better. Of course, this meant completely reworking the pattern chart to fit in a smaller number of stitches. Once figured out, I worked up the hat a bit beyond the wording section & was overall happy with how it was turning out. Tried it on again & discovered that the hat tightened up a lot as I worked. Just the nature of tunisian I suppose. So it was time to start over on the hat. Le sigh.
But opprotunity can be found even in our failed attempts! In my tunisian research, I found out that you can use tunisian crochet to create a true knit fabric. Without touching those dreaded knitting needles.
Mind. Blown.
I HAD to try this! And looky here, I had a piece of tunisian crochet with no use that I could play with!
The example I found took a hat made with tunisian simple stitch (tss, aka afghan stitch), and once finished, completely removed the yarn used for the return pass, leaving the creator with a true knit.
Here's my attempt at the same, with a piece made in tks:

When I tested the amount of stretch on the original tks piece, I found that a 1 inch section stretched to an additional 1/8 inch, at maximum.


Overall, I'd say not a bad experiment here. The verdict: yes you can cheat your way into a knit fabric using tks. I wouldn't do this with color changes, without more practice to see if it can be done without becoming so sloppy looking. Also not sure how the finished look would turn out when starting with tss vs tks. The increased holey-ness in the resulting knit could be countered by doing the tunisian with a tighter guage.
But the quest for this hat continues...
February 8, 2013
Nerdy + Crafty = Art!
It's been a while since I've blogged! Life tends to come up, it seems. I'm currently working through some business challenges, but I'm on my way to turning things towards greener pastures! :)
In the crafty world, I'm still working on the knitted yellow scarf. It's about a foot long now. Wish I had made it narrower, so it would grow faster, but I'm not frogging it again. (Yes, I know, it started out too narrow to begin with. Oh well. When it comes to big, fluffy, fuzzy scarves, too big is always better than too thin!)
I got my tassel belt to be wearable. It turned out really great! I still have some banjara fabric to add to it, but that project is on hold at the moment. Pictures to come!
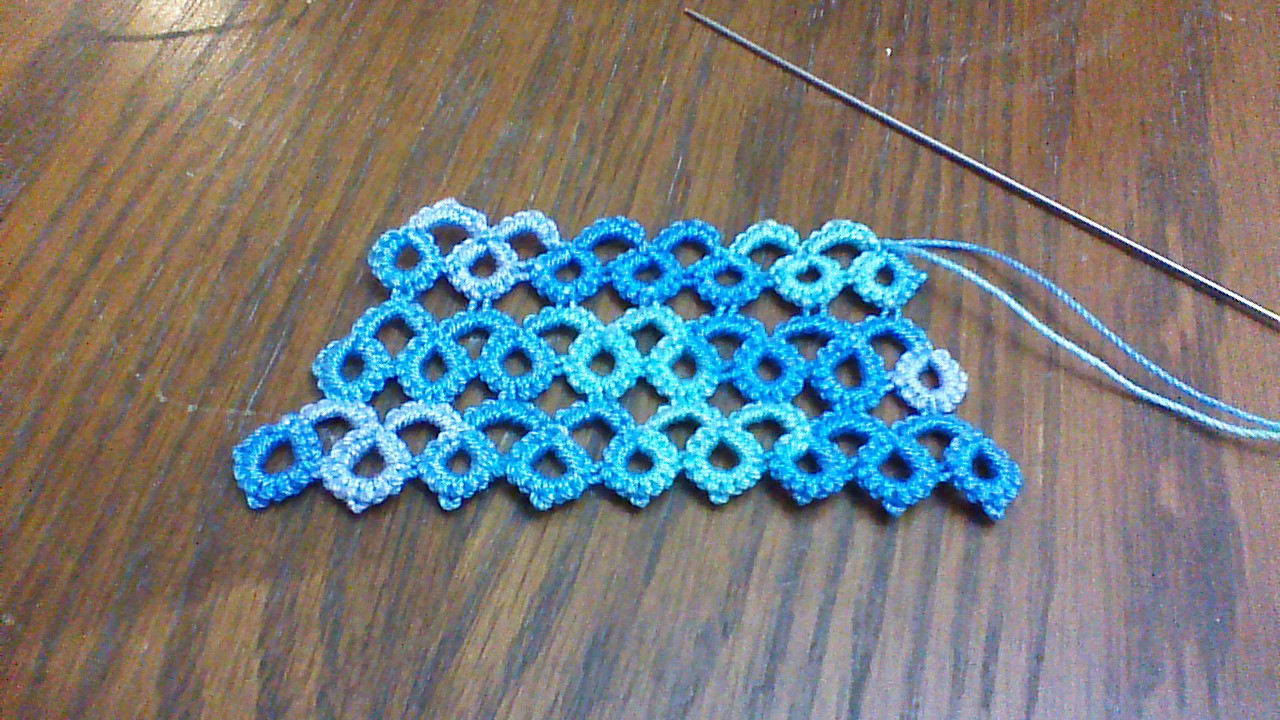
I've been up to some tatting as well. I made a gift for my friend's housewarming party. She's kinda geeky, & likes pretty things. I found a tatting pattern for Anne Bruvold's Flying Minor Norwegian Dragon. Asked my friend what colors she'd like for her mysery gift, and she replied blue, green, or gold.


In the crafty world, I'm still working on the knitted yellow scarf. It's about a foot long now. Wish I had made it narrower, so it would grow faster, but I'm not frogging it again. (Yes, I know, it started out too narrow to begin with. Oh well. When it comes to big, fluffy, fuzzy scarves, too big is always better than too thin!)
I got my tassel belt to be wearable. It turned out really great! I still have some banjara fabric to add to it, but that project is on hold at the moment. Pictures to come!
I've been up to some tatting as well. I made a gift for my friend's housewarming party. She's kinda geeky, & likes pretty things. I found a tatting pattern for Anne Bruvold's Flying Minor Norwegian Dragon. Asked my friend what colors she'd like for her mysery gift, and she replied blue, green, or gold.


(There's that banjara fabric on the table, waiting to be put on the tassel belt.)
I tatted this up on needles, with DMC Perle Cotton size 5, in a variegated green/yellow, & set it in an 8 x 10 frame backed w/ sparkly midnight blue scrapbooking paper. The dragon isn't mounted to the backing, so if she wants to take it out & sew it to a bag or something, she can. Gotta say, I really liked working with Perle cotton! Very nice thread! A little rough on the hands, but the lace it makes looks fantastic! And it's available in a wide variety of pretty colors. For the dragon, I'll probably stick to the variegated colorways Perle has. If you're going to tat with Perle, though, wind it on an embroidery thread bobbin first (little flat cardstock looking thing) to keep it from tangling as you work.
Ok, off to the office to be a business building badass! TGIF!
January 25, 2013
Jewelry Organization on the Cheap
I love jewelry. Some ladies have power suits; I have power necklaces. It is very rare that you'll ever see me without at least earrings on, and if I'm at the office, you can guarantee I'll be sporting a necklace & earrings. (I love bracelets, too, but I can't wear them when I'm treating patients.)
I have collected a fair amount of jewelry over the years. No need to call hoarders, by any means, but in my tiny, organizationally challenged home, it was getting a bit difficult to manage. For years, I've had my necklacesthrown stored in a box on a shelf, and my earrings & bracelets tossed into a desk drawer along with my makeup & hair accessories. It was getting difficult to find things, and when I tried to grab one necklace, there were always at least six others tangled up with it. The earring situation was getting out of hand, too. I tried to organize the drawer by puuting my earrings into some jewelry boxes i got for free, but, it was still a mess, and I kept forgetting which box a pair of earrings might be in. It was getting so bad that I wasn't even bothering to put my earrings away. Just left them on the desk in a pile.


I finally got fed up with it. But a typical jewelry organizer wasn't going to work. The jewelry boxes that sit on a shelf never hold enough jewelry pieces for me, and I don't have the funds or the space for the big wall or freestanding organizers. Craftiness Activate!

I grabbed my old bulletin board from high school, and covered it with some canvas I had in my stash. I turned under the edges of the fabric & just stapled it to the cork. A spare piece of ribbon got thumbtacked across the top to hang earrings off of. Nearly all of my earrings are on fish hook type wires. More thumbtacks went in to hang necklaces & bracelets off of.


Boom, done! Completed in an evening, absolutely free, & takes up no space in the apartment. All my jewelry is now easy to find. For my sets, I keep the earrings just above it's matching necklace. Added bonus: with all the necklaces hanging from the same level, I can quickly tell which ones are longer/shorter than others, which makes the trying on of necklaces when I get ready in the morning much faster! If I try to pair a necklace with a shirt, but the necklace is too long, I can quickly tell which other, shorter necklaces are better contenders. And now I'm much less likely to throw all my jewelry in a pile on the desk again!
Today: phone meeting with the business coach (cringe), run stats for the office, make a housewarming gift to give to a friend tomorrow night, & chillax with the much-neglected-of-late husband.
TGIF!
I have collected a fair amount of jewelry over the years. No need to call hoarders, by any means, but in my tiny, organizationally challenged home, it was getting a bit difficult to manage. For years, I've had my necklaces


I finally got fed up with it. But a typical jewelry organizer wasn't going to work. The jewelry boxes that sit on a shelf never hold enough jewelry pieces for me, and I don't have the funds or the space for the big wall or freestanding organizers. Craftiness Activate!
I grabbed my old bulletin board from high school, and covered it with some canvas I had in my stash. I turned under the edges of the fabric & just stapled it to the cork. A spare piece of ribbon got thumbtacked across the top to hang earrings off of. Nearly all of my earrings are on fish hook type wires. More thumbtacks went in to hang necklaces & bracelets off of.

"Why did you hang it so high? I can't bat at any of that!"


Boom, done! Completed in an evening, absolutely free, & takes up no space in the apartment. All my jewelry is now easy to find. For my sets, I keep the earrings just above it's matching necklace. Added bonus: with all the necklaces hanging from the same level, I can quickly tell which ones are longer/shorter than others, which makes the trying on of necklaces when I get ready in the morning much faster! If I try to pair a necklace with a shirt, but the necklace is too long, I can quickly tell which other, shorter necklaces are better contenders. And now I'm much less likely to throw all my jewelry in a pile on the desk again!
Today: phone meeting with the business coach (cringe), run stats for the office, make a housewarming gift to give to a friend tomorrow night, & chillax with the much-neglected-of-late husband.
TGIF!
January 23, 2013
Tatting & a video tutorial!
I've still been plugging away at tasks to get done at work & in craft-land. In the latter category, I mentioned before that I'm working on Jane Eborall's TIAS. http://tatitandsee.blogspot.com/2013/01/introduction-to-tias-2013.html I'm liking this project. It's in bite sized pieces, which keeps me from completely ignoring all the other things I need to get done (we have to wait a few days between the release of each piece of the pattern). This project is also teaching me some new techniques.
Here's my progress so far:
Day 1
 Just basic rings & chains. Working with size 10 crochet cotton.
Day 2
 In this section, I got to learn how to do a split chain. The interwebs were surprisingly lacking in tutorials for needle tatting such a thing. I found this video & tried it, but didn't care for the results. The sideways ring bothered me & my mild OCD. I ended up doing the split chain the same way as a shuttle tatter would, and like the results much better.
Day 3
 Nothing new. Just a continuation of the split chain to climb up to the next row, which is a ring & chain shorter than the previous.
Day 4
 Adventure Time! This section involved creating an outline using Catherine Wheel joins. The internet produced absolutely zero tutorials for how to do this type of join with tatting needles. It seemed to be a shuttle-only technique. I tried to substitute other types of joins, but nothing produced the nice, neat, smooth edge I was seeing in other people's pictures. So I tinkered & figured out a way to make a Catherine Wheel join happen for needle tatters. And then I used my shiny new tablet to make my very first video tutorial! Woot! I almost feel techy! Head on over to my YouTube channel to watch the tutorial. (With a special appearance by the ever-adventurous Tali-cat!) If you have any questions, feel free to ask me there or here on the blog.
I'm still not sure what the TIAS project will be, in the end. That's part of the fun! There will be something like 11 parts to the pattern, so we're not quite halfway there yet. My guesses so far: a basket, or a hat. We'll see!
Well, that's enough adventure for this morning & I'm out of time. Happy Wednesday!
Here's my progress so far:
Day 1

Day 2

Day 3
Day 4

I'm still not sure what the TIAS project will be, in the end. That's part of the fun! There will be something like 11 parts to the pattern, so we're not quite halfway there yet. My guesses so far: a basket, or a hat. We'll see!
Well, that's enough adventure for this morning & I'm out of time. Happy Wednesday!
Subscribe to:
Posts (Atom)