October 15, 2012

Bellydance Pantaloons

A friend recently asked for my advice & help making a bellydance costume for her for Halloween. (Squee!) I was of course happy to oblige! :) I convinced her that if she intended to twirl in her big dance skirt, she should probably make some pantaloons to wear with it, to keep modest. I then proceded to blow her mind a bit when I told her we didn't need a pattern to make them. I've made a few pairs of pantaloons in my day, with different variations each time. I've looked online at several tutorials throughout the years, and have come up with my own best-fit conglomeration of how I like to make them. I typed up my destructions for my friend, & thought I'd share them here. Images are courtesy of Shambling Shimmies: http://www.shamblingshimmies.com/2011/02/01/how-to-make-your-own-pantaloons/

Now if you're not familiar with bellydance costuming, you may be wondering, "Just what the heck are pantaloons?" Pantaloons are comfy, baggy pants with an elastic or drawstring waist. They are quite a bit longer than your legs, with elastic or ties at the ankles, allowing them to poof & puddle over your feet. They are great for bellydancing costumes as a way to keep from flashing everyone when you spin. They also make awesome lounge pants.

Good fabrics for pantaloons include cottons that will breathe, such as gauze or broadcloth. Pantaloons are typically worn underneath of at least one skirt. While you can make some beautiful pantaloons with silks, satins, & taffetas, keep in mind that these fabrics don’t allow any airflow and will become HOT. Think of where & when you’ll be wearing this pair of pantaloons (inside, outside, hot weather, cold weather, climate controlled environment, under four skirts, by themselves/with no skirts) & choose your fabric accordingly.

Pantaloons are typically termed by the number of yards of fabric used to make them. The standards in the dance world are 2-yard pantaloons & 4-yard pantaloons. 2-yarders start with 2 yards of fabric total, which ends up being 1 yard of fabric around each leg. 4-yarders end up with 2 yards of fabric around each leg. ATS bellydancers prefer the 4 yard pantaloons, as they look great flaring out under our skirts when we spin.

Look at the pretty pantaloons! We're all rocking 4-yarders here. 


Measurements:

Easy Length: If you get 45” wide fabric, use the full width as the length of the pants.
Precise Length (for those who are rather tall, rather short, or just want to be particular about things): measure from where you want the pants to sit on your hips/waist to the floor. Add 8” for drape & seam allowance.

Crotch Length: Measure from where you want the waist to sit on you in front, down between your legs, & back up to where you want the pants to sit on you in the back.
Divide this number in half, then add 2”. The resulting measurement is the crotch length we’ll use when cutting the fabric.
Crotch Depth: Sit on a hard chair. Measure from where you want the pants to sit on you to the chair’s surface. Add 2”.

Directions:

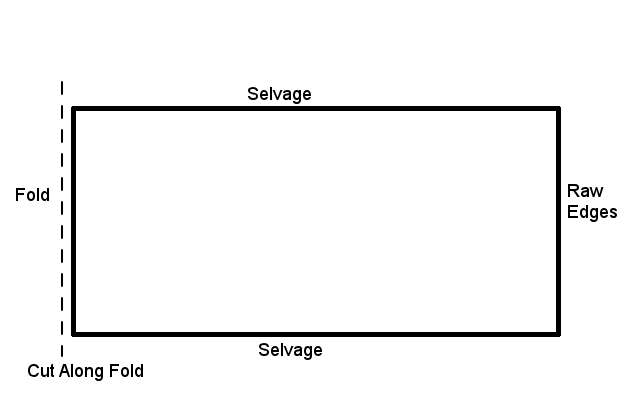
Lay your fabric out so that the selveges aren’t touching & there’s no fold in the fabric. Fold in half to make the two cut edges meet. Cut along the fold to get two pieces of fabric.


Keeping the two layers of fabric together, fold in half again to make the raw edges meet. (Ignore the part in the diagrams that refer to an edge of added strips.)


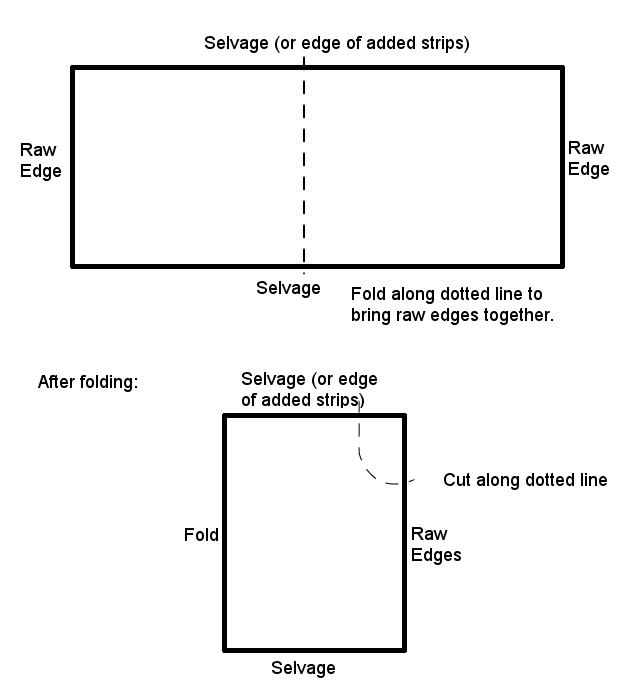
Mark your crotch depth along the raw edge. Draw the curve of your crotch length from the selvege to the crotch depth mark. Cut along the crotch length line.

Now separate the two pieces of fabric. With one of the pieces, fold it right sides together so that the bottom of the crotch curve on each side matches up. Sew down the length of the pant leg.


Repeat with the other piece of fabric. You now have two tubes.

Turn one tube right side out. Place it inside the other tube, right sides together, matching up the crotch curves. Sew along the crotch curve. Turn the pants right side out. They should look like pants now. J

On the bottom of one pant leg, press up ½” to the inside, then up again 1” from the first press line, again to the inside. Stitch, leaving a 2” gap to insert elastic or ties. Insert elastic or drawstring into the casing. Repeat on the other leg.

If you want less bulk at the waist when you wear your pants, pleat the waist before making the waistband casing. Be sure, after pleating, that the waist is still large enough to go over your hips easily.

Press the waist down ½” to the inside, then down again 1 ½” from the first press line, again to the inside. Stitch the folded waistband, leaving a 2” gap to allow you to put in a drawstring or elastic. Insert your elastic or drawstring.

Enjoy your new pantaloons!

Variations:
The above tutorial is the most basic & easiest way I've found to make pantaloons, but there are other tweaks you can make to the recipe.
  • Make a yoke at the waist. Don't like a lot of bulk at the waist? Want a shiny, slick fabric for the pants but worried your skirt will slip around on it? You can make a band of fabric (cotton works great) that's just big enough to go over your hips. Make it about 4-6 inches tall. Make your crotch depth & crotch curve length that many inches less when cutting out your pants. Make the pants according to the directions above, but instead of doing a fold-over type of waistband, pleat or gather the waist of the pants to match your yoke & sew them together. 
  • Ankle cuffs. Pretty much the same directions, but instead of elastic at the ankles, gather the fabric of the pants & attach to a small tube of fabric. You want the tube big enough to get over your foot. A good cuff height is about 4 inches.
  • Outside slit. A little more I Dream of Jeannie/Cabaret/Night Club/Halloween feel than what the ATS bellydancers go for, but it's a fun variation if you want to show a little leg. Instead of drawing & cutting your crotch curve on a raw edge, draw & cut on a folded edge. This will give you seams on the outside of your leg, rather than on the inside. Sew each pant leg just at the top & bottom of the outside seam. Finish the edges of the side seams however you prefer to keep them from fraying. Finish the waist & ankles as above. I did this variation once as a beach cover-up: White cotton fabric, side slits down the leg, & I made the pants go just below my knee to be reminiscent of board shorts. Very fun, & helpful to keep cool & sunburn-free on float trips!
Questions? Ask away!

July 25, 2012

Tiered Skirt Tutorial


Someone over on Tribe.net asked for advice on making a tiered, 18 yard skirt. My reply turned into a tutorial, so I figured I'd copy & paste it over here for you all to enjoy as well. :) What is an 18 yard skirt, you ask? In American Tribal Style (ATS) bellydance costuming, we wear tiered skirts that give us a lot of fabric at the hem, which is great for flying during spins or for tucking in beautiful ways, with minimal fabric at the waist. A tiered skirt also leaves more useful leftover fabric when you're done making it than a circle skirt does, and the math is easier. An 18 yard skirt is 18 yards around the hem. Common skirts used for ATS dancers include 10 yard skirts (great for flying) and 25 yard skirts (great for tucking). The number of yards of the skirt means only how many yards in circumference the bottom tier is.

So behold! A lovely, albeit lengthy, tutorial! Enjoy!


I made a tiered 10-yard skirt last year, using a layout where all of my strips for the skirt were cut running the length of the fabric (vertically, as you describe it), keeping the grain of the fabric consistent (lengthwise/horizontal to the ground for all tiers). The same concept could be applied to making a bigger-than-10-yard-skirt, too.

The basic calculations for a tiered skirt is that each tier is half the circumference of the one below it. If you're working with an 18 yard skirt (to make the math a bit easier), it's 18 yards around the bottom tier, 9 yards around the next tier up, and so on.

To figure out the height to make each tier, measure how long you want the total finished skirt, and divide it by the number of tiers you want it to have. Most 10-yarders have 3 tiers. (I made mine with 4, and wouldn't recommend that many. It got too tight through the hips.) So if you want the finished skirt to be 36 inches long, with three tiers, each tier needs to have a finished height of 12 inches. Add your seam allowances to the height of each tier to figure out how tall to cut them. **Each tier will have a different height!** I like 1/2 inch seam allowances, so we'll use that for examples. For the bottom tier, just add the seam allowance to the top of this tier (we'll be laying it out so that the selvage will be on the bottom of the skirt, so we won't have to hem it.) The middle tier will need a seam allowances added to both the top & bottom of the tier. The top tier will need a seam allowance added to the bottom of it, and enough added to the top of the tier to fold over & turn into a casing for a drawstring or elastic. (There are other methods to treating the waist, but for simplicity, we'll stick with a fold-over casing.) We'll say we need 1.5" extra to make the casing.

So using these figures, here's what each tier's dimensions work up to:
Bottom tier: 18 yards around x 12.5" tall. (12" + .5")
Middle tier: 9 yards around x 13" tall. (12" + .5" + .5")
Top tier: 4.5 yards around x 14" tall. (12" + .5" + 1.5")

You could easily get away with having 4 tiers for an 18 yard skirt. If that's the case, your tiers will be as follows:
Finished skirt length: 36"
Finished height of each tier: 9" (36/4)
Bottom tier: 18 yards around x 9.5" tall (9" + .5")
Second tier from the bottom: 9 yards around x 10" tall. (9" + .5" + .5")
Third tier from the bottom: 4.5 yards around x 10" tall. (9" + .5" + .5")
Top tier: 2.25 yards around x 11" tall (9" + .5" + 1.5")
Play with it to find out what you prefer before you start cutting the skirt fabric.

Using the figures above for a 3 tiered 18-yard skirt, here's how you can get all your tiers with the grain running the length of the fabric. (I like to map this out on some graph paper or something first. Better safe than sorry!) Substitue your measurements of tier height if you came up with something different and if you want a different number of tiers:

Start by folding your fabric in half, lengthwise. If you bought your fabric off of a bolt, it's already folded that way. Press the fabric to make sure everything is smooth & plays nicely. The length of fabric you need will be half the total circumference of the bottom tier of the finished skirt. To make a 10-yard skirt, you'll need 5 yards of fabric. For an 18-yard skirt, you'll need 9 yards of fabric.

Measure & mark 12.5" up from the selvage side of the fabric, for its entire length. (Again, substitute your own measurements.) This will be your bottom tier. If you have fabric with a lengthwise border on it (like sari fabric, etc.), the border will be on the bottom tier. If you're planning to add trim to the bottom of the skirt, we'll add that in a little while.

To mark out the middle tier, measure & mark 13" up from the line you just drew. This section only needs to go half the length of the fabric, so 4.5 yards, instead of the whole 9 yards (tee hee!) of the fabric.

Where to lay out the top tier depends on the width of your total fabric while it's folded in half, and how you want your leftover fabric arranged.

If you have at least 14" left between the line you drew for the top of the middle tier and the fold of the fabric, you could lay out the top tier above the middle one. Measure & mark 14" up from the line you drew for the top of the middle tier, and extend the length of the top tier to be half the length of the middle tier, 2.25 yards. This way will leave you with a triangular-ish shape of leftover fabric.

Or you could lay out the top tier beside the middle tier. On the half of the fabric not being used for the middle tier, measure & mark 14" from the line you drew for the bottom tier, and extend the length of the top tier section to be half the length of the middle tier, 2.25 yards. This way will leave you with a 9-yard long strip of leftover fabric.

(Again, play with your layout on some paper first to find out what works for you, given the number of tiers you want & how you'd like your leftovers arranged, in case you want to use the leftovers for another project.)

So the layout should look something like this when you're done. Pretend the right side of this figure is straight across. And ignore the ..... They are just blank spaces that would otherwise be auto-corrected into oblivion. :)
___________________________Fold_____________________________
|.top tier: 2.25yds..|..........................................................................................|
|____x 14"______|______________...................leftover fabric......................|
|.....middle tier: 4.5yds x 13"..............|..............................................................|
|____________________________|_______________________________|
|.......................................bottom tier: 9yds x 12.5"..........................................|
|___________________________________________________________|
                                                           Selvage

or

___________________________Fold_____________________________
|..............................................leftover fabric...................................................|
|___________________________________________................................|
|.....middle tier: 4.5yds x 13"...............|...top tier: 2.25yds..|..............................|
|____________________________|___ x 14"________|_______________|
|......................................bottom tier: 9yds x 12.5"...........................................|
|___________________________________________________________|
                                                           Selvage

Check that everything is laid out how you want it. Pin the sections so that the two layers of fabric won't shift while you're cutting. Cut your layers from the fabric. Mark the right sides of the fabric, if you can't tell by glancing at it. Unpin.

Now is a good time to attach any trim you'd like onto the bottom tier. It will be more difficult to do this once the skirt is assembled, because the gathers will keep the hem from laying flat again.

Assembly:

You'll be putting the skirt together as a front half & a back half, then sewing the two halves together to finish the skirt. Work from the bottom tier to the top tier. It's less fiddly this way.

Using your gathering method of choice, gather a 9 yard section to fit onto the bottom of a 4.5 yard middle tier section. Pin like crazy & sew them together.

Gather the top of the middle tier you just sewed to the bottom tier. Gather the top of the middle tier to fit onto the bottom of the 2.25 yard top tier. Pin like crazy & sew them together.

You now have half a skirt! Repeat assembly instructions to put together the other half of the skirt. Pin the outer edges of the skirt halves together, wrong side out, and stitch from the bottom of the skirt to the waist. If the heights of your skirt halves don't match perfectly, you can correct it at the waist much easier than you can at the hem, especially if you have a border on the bottom tier.

Press down the top of the top tier 1/4", toward the wrong side of the skirt. Press down again another 1/4" from the fold you just made. This encases the raw edge of the fabric to protect it from ravelling as the drawstring rubs through the casing. Press down again 1" from the second fold you just made. Stitch down, leaving a gap in stitching to allow a drawstring or elastic to be inserted.

Put in your elastic or drawstring, and you're done! :D

Questions? Ask away!

April 8, 2012

Crafting & real life: the great balancing act

So the practice is starting to pick up a bit! Yay! I had several new patients last week, and so far, at least a few more scheduled for this coming week. Hooray! I'm so far behind in administrative tasks, though, that it's not even funny. I'm headed into the office for a couple of hours today (Sunday) to see if I can put a small dent in some of the paperwork. My work to-do list is literally over 1 page, typed in 11 point font. And that's not counting the personal life to-do list. I need about 5 more me's and an extra 10 hours added to each day, preferrably ones I can stay conscious during.

On the apartment fiasco, the carpeting and pad in the bedroom have been replaced. Of course, the apartment complex has yet to do anything to prevent the water from just coming in again and ruining the new carpet just like the old one was. *sigh* I was told by the office manager that she's going to have a contractor out sometime to see where the water pools outside and quote her a price for putting in a drainage system. I've tried to reach her a couple times since hearing this, to see where we stand on the situaiton and if, indeed, anything is actually going to be done to fix the problem, but she has yet to respond, and it's been over a week.  Currently, there are flags out and paint sprayed on the ground marking the electric lines outside our apartment and across the parking lots to some of the other buildings. Water lines have also been marked across the parking lot. A hole has been dug a little way away from our apartment, but there's no indication what it's for, and I know it's not where the water pools. I can only hope this is the early stage of the drainage system project, but who knows. I just keep hoping to avoid any major downfalls of rain, or several days in a row of rain. The new carpet is nice. I'd like to keep it that way!

Crafting has been resumed, but it's not my idea. Anime convention season is quickly approaching, with the first major con being April 27th. Here's the costumes Brian decided we'll be making & wearing this year:
Nightmare, from Soul Caliber V:  http://images.wikia.com/soulcalibur/images/1/18/Nightmare_Soul_Calibur_V.jpg
Pryha Omega, from Soul Caliber V: http://www.videogamesblogger.com/wp-content/uploads/2011/07/soul-calibur-5-pyrrha-omega-artwork-646x597.jpg
I told Brian multiple times that I wasn't going to have time to work on these costumes. Turns out I actually don't have the time, energy, or patience for them, either. He still refuses to man-down on these, though. And due to the time-crunch, he has them at the top of his priority list. They're far from even on my radar as far as my priorities go, but I'll be plugging away at them as best I can. We do what we can to keep the peace in our relationships, right? Here's hoping we get these costumes done, and done well enough that the fiance doesn't whine the whole time at the conventions. And that I don't die of exhaustion or depression in the meantime.

March 19, 2012

Busy! And wet!

It seems I'll be starting most of my blog posts with an apology for there being so much time in between them! One of these days, the chaos of life will calm down enough to let me do fun things & tell you about them. Here's hoping!

So the newly opened practice is keeping me rather busy. Business itself is still pretty slow, but I've been busting tail getting groundwork laid to let the community know about me and how I can help them, so things should start picking up soon. :) Currently, I've been scampering all over the county to various networking meetings and Chamber of Commerce events, on the phone with insurance companies trying to get in-network so that it's easier for patients to see me, and planning some networking events coming up. Unfortunately, that hasn't left much time for crafting, which is making me just a tiny bit crazy. :P

This weekend, I intended to be Ms. Super-Productive, and put a serious dent in my professional and personal to-do lists. (They're getting scary long!) Instead, though, I spent most of my Saturday dealing with this.

https://www.facebook.com/video/video.php?v=705313459730


(I couldn't get Part 2 to load into the blog directly, so facebook video links will have to do.)

So yay. This was the second or third day in a row of rain, so the ground was soaked and the additional rain water had nowhere to go. Also, the area outside our apartment has horrible drainage, since we face into a hill. Add those to the cracks in the concrete foundation (we're directly on the slab), and you get a whole lot of water in the bedroom. Joy. We'd had a little water get into the bedroom Friday night, but not this bad. At least all that got wet of our belongings this time was the pile of dirty laundry that I'd planned to wash on Saturday anyhow. After washing the wet dirty laundry, I strolled over to the main office to let them know we were having water issues again, and that they'd never fixed the issue after the first time it happened back in June of last year. Fortunately, I spoke with the same person this weekend that I did back then, so she had an idea of what was going on. They said they couldn't get anyone out to look at anything until later on this week. Ok, fine. Not 15 minutes after getting home, the skies opened up with the above torrential downpour, bringing in more water into the bedroom than I've seen in there before. I went back to the office to let them know I wouldn't be able to make it until later on this week. A few hours later, they sent a guy over to suction out the excess water in the bedroom, but it's still wet--not just damp. Not sure if the apartment complex will still be sending someone over sometime to address the reason WHY the water is coming in in the first place, but we'll see. I've got numbers to contact if they take more than a few days. The apartment already reeks of mildew, and I can't sleep next to that for long before my immune system surrenders. Can't afford to get sick now!


I'll sign off by leaving you another quick tutorial I left on my friend's sewing blog. I'm still hoping to get some actual craft projects posted soon! In the meantime, enjoy! My friend had sewn up a couple things, but was really disappointed after they fell apart in the wash. She didn't know about finishing off her seam allowances, so I offered the following quick pointers:

After I finish stitching a seam, I go back and put a zig-zag stitch over the raw edges of the seam allowances (there's a setting for zig-zag stitches on my machine). If the seam allowance is pressed open, I'll zig-zag over each seam allowance separately (single layer of fabric). If the seam allowances are pressed to the same side, I'll zig-zag over both of them at once (two layers of fabric). Fray check also helps. For those with sergers, you can serge the edges, instead of doing the zig-zag over them. When you trim down seam allowances (sometimes you don't have to, like on a straight skirt, for example), make sure you leave at least 1/4 inch of seam allowance from the seam stitching. All of these measures will help minimize of eliminate unraveling.

February 16, 2012

Tutorials!

Ok, so I'm struggling to squeeze in the time to blog, despite my hopes of managing a post per week. Between opening my Chiropractic office, and working on a solo and costuming for a bellydance performance coming up next Friday, I'm pretty swamped! But at the suggestion of a friend, I've got a consolation prize for you! This friend recently wanted to teach herself how to sew, and has been keeping a blog of the process. (She's doing fantastic at sewing! I'm so proud of her!) Sometimes she asks for suggestions for how to do things in her sewing adventures, so I've typed up a few tutorials to help her along. She knows I'm pretty bad about keeping up with my own blog, so she recommended I put up my quick tutorials here as well. While I know my current followers are accomplished sewers, maybe they'll pick up a new and different way to do something from my tips. And for those who aren't yet followers and stumbled upon this blog by whatever means, I hope you enjoy these little tutorials as well!

In this evening's tutorial, I'll explain how to make pretty hems. This was originally written in reference to hemming a shirt, but the same concept woud apply to just about anything needing hemming, from garments to home decor. Enjoy!

How to Make Pretty Hems

1. Take an index card that has lines on it. Cut off the very bottom section, along the lowest of the blue lines. Each line on an index card is 1/4 inch apart. We will use this as a press card, so we will never need to truely measure a hem. :)

2. Determine how deep your hem needs to be. Many patterns will say to do a 1/2 inch hem, a 1 inch hem, a 2 inch hem, etc. If the pattern doesn’t say, I’ll typically do a 1/2 or 3/4 inch hem.

3. Heat up your iron to the appropriate setting for your fabric. If you’re unsure, test it on a scrap piece. You want it hot enough to make a nice crease, but not so hot that it scorches the fabric. If you smell smoke, it’s probably too hot. ^_~

4. Place you’re garment on the ironing board. Move things around so that only one layer of fabric is on the board, with the wrong side facing up. Place your press card on the wrong side of the fabric. Bring the edge of the unfinished hem up over the bottom edge of the card to meet the first line (1/4 inch). Press with the iron. Work the next section over in the same fashion, being sure that each pressed section touches & joins into the previous section. Repeat until you get back to where you started. Now you have 1/4 inch of the hem pressed up all the way around the garment. (Small note: if the curve of the hem is very deep, you can fold the press card in half vertically and use it in the above manner.) At this point, you can either stitch this part down, or just continue on to the next step. I usually just go on without stitching, to save time. I’m a lazy crafter. ^_~

5. Put your press card on the wrong side of the fabric again. Subtract 1/4 inch from the depth of hem which the instructions said to make. This will be the amount you will press up for this round. (If it said to make a 1 inch hem, you will press up another 3/4 inch, or 3 lines from the bottom of the card.) Keeping the pressed/creased edge folded over, bring the pressed edge up to meet the appropriate line on the press card (the third line from the bottom in the above example of a 1 inch total hem). Press the crease made by the card. Repeat the process on the next section, all the way around the hem. Make sure that each pressed section joins into the previous one. Once you’re done with this round, you should have a nicely pressed, even hem, with no raw edge of fabric showing.

6. Pin down the hem if you need to, and sew it down. It’s best if you get as close to the first pressed edge as you can. This is the edge that’s further up on the garment. If you want, you can always add another round of stitching 1/4 inch below that, but it’s usually fine without it.

Voila! Pretty hems!

If you have any questions, or if anything here was confusing, please leave a comment below and I'll do my best to help! Thanks for reading! (One of these days I'll actually get a completed craft posted!)


P.S. I finished the knit scarf I was working on! Haven't taken any pictures of it yet, though. It'll get on this blog eventually!

January 27, 2012

Still Alive!

Soooo... It's been a while! Sorry about that! But I did warn you, I'm not so great at keeping up with these things. ;) Truth is, life's been kinda crazy busy, so this little blog got pushed to the wayside for too long. But things have calmed down (a little), so I'm hoping to get caught up with all the blogging I missed! I'm going to try for one blog per week, at least. I still make no promises, though!

Just what have I been up to, you ask? Well, mostly finishing up chiropractic school. I'm now a board certified, licensed Doctor of Chiropractic! Huzzah! Things got a little hectic towards the end of school, as I'm sure it does in just about any college--feverishly trying to get all the graduation requirements completed in time, hounding the staff person who tallies all those requirements, tests, etc. But I made it through unscathed, and I'm still alive! There wasn't any cake, though. ;) I even managed to craft some farewell gifts for some of my mentors.

After graduation, I was still running helter-skelter, crafting up a storm of christmas presents. And working on the paperwork to get licensed and get my practice set up. And planning my wedding for this coming fall. And there was a week-long ski/snowboard trip somewhere in there, too. And more crafting! A true craftaholic will tell you, there's always a little time to craft things! Just like there's always room for dessert!

Currently, I don't think things have really slowed down for me that much, but they're different, so I feel a little more confident I'll have time to post here more often. As of now, I'm still working on some of the legal aspects of getting a practice up and running (tax ID numbers, etc.), gobs of marketing to be sure I have patients the first day my office is open, more wedding planning, more crafting (always crafting!), and completely reorganizing my craft room/office. It's been affectionately dubbed the "Croffice." :)

So while I have no pretty pictures of crafty goodness for you today, I hope to soon! I'll be working on posting all the crafts I made in my blogging absence, and also telling you about the projects I'm working on from here on out. We'll see how I do!